Chuyển đến nội dung chính

Tạo đĩa cứu hộ DLCD chuẩn UEFI

Chạy CMD dưới quyền quản trị (admin), nếu như bạn đang sử dụng Windows 8 trở lên thì nhấn tổ hợp phím “Windows + X” và chọn “Command Prompt (Admin)”
Cửa sổ “Command Prompt” hiện ra bạn gõ lệnh DISKPART > gõ tiếp lệnh LIST DISK để nó liệt kê ra toàn bộ ổ cứng của bạn.
Tạo usb chuẩn UEFI chứa bộ cài Windows
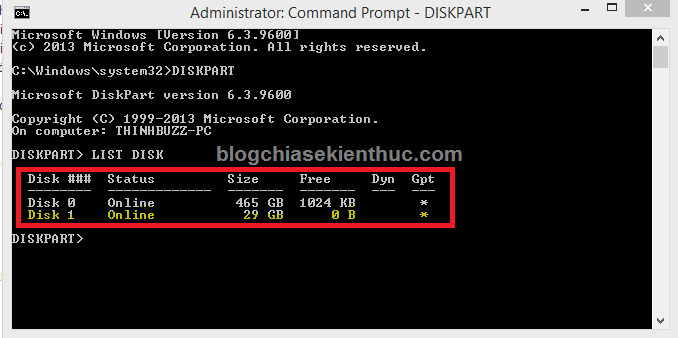
Ví dụ như trong hình thì Disk 1 là USB và Disk 0 sẽ là ổ cứng, bạn nhìn vào dung lượng (Size) để biết được chính xác đâu là Disk của usb nhé.
+ Sau khi bạn đã biết được chính xác đâu là DISK của USB thì gõ tiếp lệnh SELECT DISK x (x là số DISK của USB). Ví dụ như trong hình trên, mình sẽ gõ chính xác dòng lệnh như sau: SELECT DISK 1
Các bạn làm theo chính xác các lệnh sau:
  1. CLEAN – Lệnh này sẽ xóa sạch dữ liệu trên ổ bạn đã chọn (ơ đây là USB).
  2. CON GPT – Lệnh này sẽ chuyển sang định dạng GPT.
  3. CREATE PARTITION PRIMARY – Lệnh này sẽ tạo Partion cho toàn bộ ổ đĩa mà bạn đã lựa chọn.
  4. FORMAT QUICK FS=FAT32 LABEL=USBBOOTUEFI – Lệnh này sẽ Format usb với định dạng FAT32 (vì UEFI chỉ nhận định dạng FAT32 mà thôi) và tên là USBBOOTUEFI (tên thì các bạn có thể đặt tùy ý, không dấu).
  5. ASSIGN – Lệnh này sẽ gán ổ địa.
  6. Exit – Lệnh này để thoát khỏi DISKPART.
  7. Exit – Thoát hoàn toàn khỏi cửa sổ CMD.
OK! đã hoàn thành. Giờ thì bạn giải nén bộ đĩa cứu hộ và copy toàn bộ file trong thư mục vào USB


Nhận xét

Bài đăng phổ biến từ blog này

Windows 10 enable long file/folder path

Windows 10 enable long file/folder path Registry Import Enabling Long Paths Windows Registry Editor Version 5.00 [HKEY_LOCAL_MACHINE\SYSTEM\ControlSet001\Control\FileSystem] "LongPathsEnabled"=dword:00000001 [HKEY_LOCAL_MACHINE\SYSTEM\CurrentControlSet\Control\FileSystem] "LongPathsEnabled"=dword:00000001 Enable via group policy editor Local Computer Policy -> Computer Configuration -> Administrative Templates -> System -> FileSystem -> Double click Enable Win32 long paths and select Enabled

Xcode 8 support devices ios 7

Tải XCode 5.1.1 về, copy 2 folder 7.0 & 7.1 trong thư mục /Volumes/Xcode/ Xcode.app/Contents/Developer/Platforms/iPhoneOS.platform/DeviceSupport sang thư mục DeviceSupport của phiên bản XCode 8 (hiện tại) Mở file SDKSetting.plist trong thư mục /Applications/Xcode.app/Contents/Developer/Platforms/iPhoneOS.platform/Developer/SDKs/iPhoneOS.sdk Thêm giá trị 7.0 & 7.1 vào key Root->DefaultProperties->DEPLOYMENT_TARGET_SUGGESTED_VALUE Thoát XCode & khởi động lại XCode

Change Timezone in CentOS | Thay đổi múi giờ trong CentOS

Timezone of VietNam is Asia/Ho_Chi_Minh. To change default timezone in centos, follow this struction.   mv /etc/localtime /etc/localtime.bak ln -s /usr/share/zoneinfo/Asia/Ho_Chi_Minh /etc/localtime Type date in terminal and you will see time in Viet Nam In Linux, the system time zone is determined by the symbolic link /etc/localtime . This link points to a time zone data file that describes the local time zone. The time zone data files are located at either /usr/lib/zoneinfo or /usr/share/zoneinfo depending on what distribution of Linux you use. For example, on a SuSE system located in New Jersey the /etc/localtime link would point to /usr/share/zoneinfo/US/Eastern . On a Debian system the /etc/localtime link would point to /usr/lib/zoneinfo/US/Eastern . If you fail to find the zoneinfo directory in either the /usr/lib or /usr/share directories, either do a find /usr -print | grep zoneinfo or consult your distribution's do...